

Recipes
Take a look at these great recipes
by Dalia Castaneda
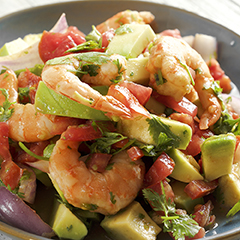
I would like to talk to you guys about my favorite dish. Aguachile is a dish originally from Sinaloa, Mexico. Aguachile is an easy dish to make. It is also my favorite dish because I have a lot of memories connected to my family through aguachile. I will explain next the important about this dish.
First, my favorite dish, aguachile, literally translates to "shrimp in chile water." The water in this case is fresh lime juice blended with fresh serrano chile. After a short time marinating in the ingredients, this delicious fresh seafood appetizer or meal is ready to enjoy. My family is from Colombia, and seafood was not as popular there as Sinaloa, where this dish is from. My family and I enjoy making this meal.
Also, this is one of the easiest dishes you can make and is very flavorful. In a few steps you can make a meal for the whole family. Even kids can enjoy this dish, depending on how many chiles you add to the shrimp. Aguachile is also very affordable. The stove is not needed at all, which is a big plus for those hot summer days.
Finally, this dish reminds me of a lot of good memories with my family. This is a meal I still make every single Friday after my husband gets off work. One of my biggest memories of this meal is with my husband. When I first met my husband, he was not used to eating spicy food, so my mom cooked this meal for us. My mom loves spicy food so the aguachile was super spicy. My husband could not take it, so he rinsed the shrimp and ate it. Until this day my mom and brothers still laugh about it.
In conclusion, this Sinaloan dish became one of my favorite foods because of the flavors, and the memories I have-- especially with my husband, which are hilarious. It is also very affordable. I recommend everyone to try this dish because you will love it.
Ingredients:
- 4 lbs of shrimp
- 5 cucumbers
- 20 limes
- 2 large red onions
- 5 jalapenos
- 2 bunches of cilantro
- 1 garlic glove
- Salt and pepper, to taste
- 2 avocados
- tostadas (tortilla chips)
- Clean the shrimp by removing the shells, tail and the veins.
- Squeeze the juice from the limes.
- Peel the cucumbers. Remove the seeds, then cut them slightly in half. Do the same with the onions.
- In a glass bowl add the shrimp and half of the lime juice. Make sure there is enough juice to cover the shrimp, and add a pinch of salt and pepper. Let sit for 20 minutes.
- Meanwhile, in a blender add the rest of the lime juice, cilantro, garlic, and the jalapenos. Blend well and pour into the shrimp you have been marinating.
- Mix everything and refrigerate for 10 minutes.
- Serve with a tostada and slices of avocado on top. ENJOY!
by Joanna Chase
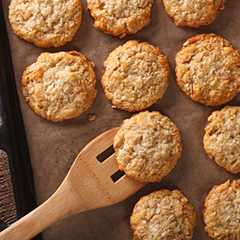
The standard story behind the ANZAC biscuits is that soldiers with the Australian and New Zealand Army Corps (ANZAC, established in World War I) were sent these biscuits by wives and women's groups to those soldiers abroad because the ingredients don't spoil easily and kept well during transport.
Preheat oven to 350F.
Ingredients:
- 1 cup quick oats
- ¾ cup flaked coconut
- 1 cup flour
- 1 cup sugar
- ½ cup butter or margarine.
- 1 T golden syrup (or honey)
- 1 tsp baking soda
- 2 T boiling water
- Mix the oats, coconut, flour, and sugar together.
- Melt the butter and golden syrup (or honey) over low heat.
- Mix the baking soda and boiling water together, then add to the melted honey butter.
- Add the liquid honey butter mixture to the dry ingredients and mix well.
- Drop by teaspoons onto a cookie sheet. Bake at 350F for 18-20 minutes.
- Makes approximately 2 dozen biscuits.
from Ellen (Irish) 1920, Boston, Massachusetts.
by Ellen Murphy
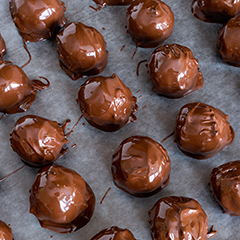
I grew up on the East Coast in Massachusetts. My grandparents lived on the North Shore. The North Shore is North of Boston, Massachusetts. One holiday, I was deemed old enough to help in the kitchen. One of the dessert candies my Great-Aunt Elizabeth (my grandmother's sister) always made was a chocolate candy. It was the most delicious liquid creamy chocolate. It did not taste like a Hershey's bar or any other store bought chocolate. What always amazed me was that she made it from scratch. When I got to help, I loved the aroma of chocolate. The mixing of the cocoa powder and the secret ingredient mesmerized me. Thus was born my passion for the kitchen.
My Aunt Elizabeth and my grandmother (Frances) were enrolled in the prestigious Fannie Farmer school of cooking in Boston. This was to ensure Frances had the appropriate skills necessary to be a successful wife and mother. My Great-Aunt Elizabeth, a teacher, had no such sights on marriage. Teachers were not allowed to marry in the 1920's. They had to remain single, and if they married, they were required to leave teaching. My great-grandparents were worried that my aunt would not know how to fend for herself once they were gone. They enrolled both young ladies in The Fannie Farmer school of cooking. Once they were enrolled, they were assigned a final task to pass. My grandmother's final task was to create a meal that would please her new mother-in-law and her new groom-to-be (she passed and the marriage occurred). My great-aunt was in a quandary. She had no such marriage prospects.
My great-aunt conferred with a good friend and they decided that since she loved chocolate of all kinds, she would learn how to make chocolate candy. This excited my great-aunt tremendously. She'd always marveled at the chocolatier on the Town Square who honed his craft in the window. She could see him tempering the chocolate on the marble, twirling, swirling and molding. Aunt Elizabeth was not a master chocolatier, but she learned fairly quickly. She was no master in the kitchen either. She frequently burned the eggs or scalded the milk. She couldn't even manage toast, which back then was done in the oven. She was dismayed that she might not pass the chocolate test. She decided in order to pass she needed to practice. Her friends and family were the testers of her endeavors. Her first endeavors were truly terrible. My grandmother would regale us with the antics in the kitchen when my great-aunt was producing her confection. She would mismeasure, she would drop utensils, she would fall into a puddle of tears. Finally, though, she passed! Everyone that tasted her Christmas candy begged for the recipe. When I turned 16, I was lucky enough to be able to spend some time with my great-aunt. It was near the holidays, and I was to be her helper. I was sworn to secrecy before proceeding. I felt grown-up and trusted.
Since this cookbook is an archive preserving the past, I share with you, dear reader, Fannie Farmer's School of Cooking Chocolate Candy recipe that is not in the cookbook. The recipe is about 100 years old, as my Great-Aunt Elizabeth graduated in the 1920's. The measurements have changed with the times, a can of condensed milk no longer has the same contents it once did in the early 1920s, or 1970s, when I learned the recipe.
I have updated to the equivalent measurements for 2020. I put the original measurements fist followed by the current 2020 measurements. You may adjust as needed in the future.
Generally chocolate candy is mixed/melted in a double boiler. Just in case, like me, you don't know what a double boiler is: a double boiler is 2 pans of different sizes. Usually the larger pan is on the bottom placed on a stove burner, filled about a quarter to half way with water. Bring the water to a boil and turn down to simmer/low heat. Place the smaller pan in/over the larger pan to melt the chocolate.
Aunt Elizabeth's Chocolate Candy
Ingredients:
- 1 can (1 ½ cup) condensed milk
- 1 Tablespoon cocoa powder
- 1 bag (4 ½ cups) chocolate chips
- 2 teaspoons secret ingredient *flavoring
- 3 Tablespoons water
- Pinch (¼th teaspoon/to taste) of salt
- Pour the can of condensed milk into the top pan of the double boiler.
- Add water and cocoa power. Mix well until cocoa powder is dissolved.
- Add secret ingredient (flavoring of your choice: peppermint, almond, anise, or vanilla).
- Add chocolate chips one cup at a time, stirring until creamy smooth. Mixture will be soft and start to solidify.
- Use a small spoon or melon baller to scoop chocolate out. If you use your hands to shape into small balls, use extreme caution as chocolate will be hot.
- Place nickel-sized balls of chocolate on wax paper to cool. Shape in smallish balls (about the size of a nickel).
- Serve when cool. Chocolate should be placed in airtight containers and will have discoloration after about a week.
- Enjoy!
by Erwin Bantugan
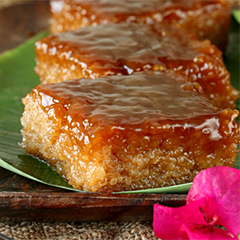
New Year is just around the corner, and it makes me reminisce on one of the Filipino traditions that my mom adheres to, and that is to make some sticky foods like rice cakes to welcome the coming New Year. Filipinos believe that eating sticky food together with family and friends will help them strengthen their bond and relationship with those people. One of the rice cakes (sticky food) that my mom makes is called biko (sweet rice cake).
Ingredients:
- 2 cups glutinous (sticky) rice
- 4 cups coconut milk
- 2 - 2 ½ cups brown sugar
- ½ teaspoon salt
- Rinse the glutinous rice (sticky rice), and combine the glutinous rice with water in a rice cooker. Use less water (1 - 1 ½) cup than the usual so that the rice will not be fully cooked.
- While the glutinous rice is cooking, combine the coconut milk with brown sugar and salt in a separate pot, and cook on low heat until the mixture thickens. Stir constantly.
- When the glutinous rice is cooked and the coconut milk-sugar mixture is thick enough, add the cooked rice in the mixture, and mix well. Do this until all the liquid evaporates.
- Spread the cooked rice mixture in a serving pan and flatten to look like a cake.
- Pre-heat oven to 350 degrees and bake for about 45 min - 1 hour, or until set.
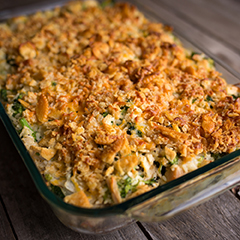
by Cathy Bernal, and Matt and Jennifer Keyes
This was a favorite of my mother-in-law's. We lost her seven years ago. My kids have continued this on and tweaked it a little to their own tastes, and we wish she had a chance to try their adaptations, but it carries on through them.
Ingredients:
- 2 pkg broccoli, chopped
- 16 Ritz crackers
- 2 cups shredded cheese
- Butter
- 1 can mushroom soup
- 1 ½ cups mayonnaise
- 1 onion, finely chopped
- 1 egg, beaten
- Cook broccoli and drain.
- Mix soup, mayonnaise, onion cheese and egg together well.
- Add broccoli, mix together, and put in a buttered baking dish.
- Top with Ritz crackers, then dot with more butter.
- Bake at 350 for 45 minutes.
- Love Mom
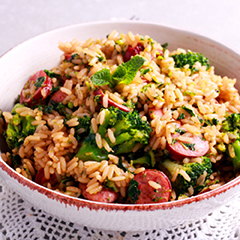
by Katrina Nehring
I named this dish when I was two, and the name stuck. This recipe evolved over time to become a family favorite!
Ingredients:
- 1 box broccoli au gratin rice mix
- 2 T margarine, for the rice mix
- 2 ¼ cups water, for the rice mix
- 1 lb beef polska kielbasa (You could also use any other type of sausage or leave it out to make a vegetarian side dish.)
- 1 head of broccoli, cut into bite-sized pieces
- 1 can of corn, drained
- Shredded cheddar cheese
- Cook the rice mix according to the box directions, using margarine and water.
- Steam the broccoli.
- Cut the kielbasa and cook it in a skillet until browned. Drain off as much as the grease as possible.
- When the rice is done, add the kielbasa, broccoli and corn, and mix all together.
- Sprinkle the grated cheese on top.
- This serves four people, so we usually double the recipe. Enjoy!
by Misa Murakami
Mochi is made with glutinous rice. The rice is traditionally steamed then pounded to a sticky paste and formed into patties. Made just before New Year's, they are stacked with a tangerine on top for New Year's decoration.
In the Spring, sugar and food coloring is added to make sweet treats for girls to share with friends on Girl's Day, 3 March.
Mochiko is mochi rice ground into flour. Japanese Americans have used it for all types of treats. I've seen recipes using jello, mashed sweet potatoes, pureed apricots and some other things.
My children like Butter Mochi, because it is sweet, and I like it because it's easy to make and ingredients are available.
Ingredients:
- ½ cup butter
- 1 pkg (1lb) Mochiko rice flour (found at Asian markets and FoodMaxx - I don't know about other stores)
- 2 ½ cups sugar (I use 2 cups)
- 3 tsp baking powder (I use 1 tsp)
- 4 cups milk (I use almond milk)
- 5 eggs, beaten
- 2 tsp vanilla (I use 1 tsp)
- 1 cup flaked coconut, optional
- Melt butter, cool, and set aside.
- Combine Mochiko, sugar, and baking powder.
- Combine butter, milk, beaten eggs, vanilla, (and flaked coconut). Stir into Mochiko mixture. Mix well.
- Pour into a 9 x 13 inch pan, lightly greased (I use a 10 x 17 x 1 inch sheet pan).
- Bake 1 hour (25 - 40 minutes for sheet pan) in 350 degree Fahrenheit oven. Or until toothpick comes out clean. Cool.
- Cut into pieces.
by Debaki Sarkar
Sunday in our household always holds memories of when offices and schools were closed, and so lunch would be a family affair. That was the only day in a Bengali household (West Bengal is a state in Eastern India) where you would hear the whistles of pressure cookers because almost every household would either make chicken curry or mutton curry (goat meat). The Sunday meal was often accompanied with white rice and big chunks of potato in the curry. After the meal the most awaited was a movie in our regional language and then followed by a football match or sometimes a good nap.
Ingredients:
- Chicken pieces
- Ground turmeric
- Red chili powder
- Ground coriander
- Ground cumin
- Ginger paste
- Garlic paste
- Yoghurt, plain
- Mustard oil
- 1 large red onion
- 1 large tomato
- 5 cloves garlic, minced
- 4 green chilies, slit in half
- 2 potatoes, peeled and quartered
- Salt, to taste
- Marinate the chicken pieces with turmeric, red chili powder, coriander, cumin, ginger and garlic paste, salt to taste, yoghurt and mustard oil. I usually marinate for 3-4 hours.
- While the chicken marinates, slice the onion and tomato, mince the garlic, slit the chilies in half, and chop the potatoes into quarters. Make a paste of the above ingredients.
- Now, heat the oil, add the above paste and fry until the oil separates out.
- Now add the chicken pieces. Mix well with all the spices and onion and tomatoes and what have you.
- Sauté for about 5-8 minutes until all the chicken pieces lose their raw coloring and the masala is all cooked. If you are adding potatoes, please add them now. Sauté for 2 more minutes. Next add water and salt to taste. Reduce the heat and let it cook for another 25-30 mins or so, lift the lid and check if the chicken is cooked and serve with piping hot rice.

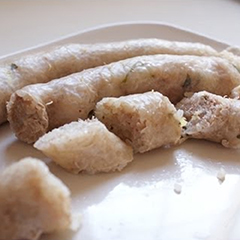
by Juvenal Tafolla
One of my favorite Mexican dishes is flautas, which are fried rolled tortillas filled with chicken. Flautas are so delectable-- the taste of fried chicken with tortillas is just one of the many flavors. We make flautas on a regular basis. They are so good, easy, and fast to make. To eat this authentic Mexican dish, you must be calm, and take your time to eventually take a bite of pure flavor.
For those people that like the spicy stuff, you could add salsa. Salsa will give the flame taste to the flautas. For those that do not like spicy food, you will still have the mouthwatering taste of the potato, tomato and carrot sauce. The potato, tomato and carrot sauce are the main topping for the flautas.
Other than the toppings I already mentioned, there are more toppings you could add on to the flautas. For example, there's cabbage or lettuce and avocado for those who like veggies. Top it off with some sour cream and queso fresco (crumbling cheese), and that will give the flautas a beautiful creamy texture and a lot more taste.
This is the reason flautas is one of my favorite dishes. They are good, easy, and fast to make. All the toppings and juicy sauces that cover the flautas just makes them so mouthwatering and unique. This recipe came from family ancestors, and the only change is that my generation might have added an extra topping to them.
Ingredients:
- 2 chicken breasts
- ½ onion
- 2 potatoes, peeled and sliced into small pieces
- 1 small bag of carrots (sliced into small pieces)
- 4 tomatoes, chopped
- Cabbage or lettuce, shredded
- 2 cloves garlic
- 2 pinches cumin
- Tortillas (as needed)
- 1 Tbsp salt
- Neutral oil, for frying
- 1 pack queso fresco (crumbling cheese)
- Sour cream
- 1 avocado (optional)
- Hot sauce (optional)
- Fill a large pot ¾ to the top with water and boil the chicken with half an onion. Add 1 Tbsp of salt.
- In another pot, add 2 cups of water, and throw in the potatoes and carrots and boil until they get soft.
- Put the softened potatoes and carrots along with the tomatoes, garlic cloves and cumin into a blender and blend well.
- Shred all the chicken once it is cooked, warm up the tortillas, and make rolled tacos with the chicken in them. With two chicken breasts you should get about 30 flautas.
- In a pan with hot oil, place as many flautas as you can and let them get a little brown and crunchy. On a plate, put as many as you want, and pour sour cream on top of the flautas. Then throw shredded cabbage or lettuce on top, and on top of the cabbage or lettuce pour the potato, tomato, and carrot sauce, then add sour cream (optional). Top it off with queso fresco (crumbling cheese) and avocado.

As told to Katrina Nehring, by Rachel Boyd
Everyone LOVED these last year, so I thought I would share the recipe!
Ingredients:
- ½ cup butter
- 2 cups peanut butter
- 1 lb powdered sugar
- 3 cups crisp rice cereal
- Chocolate for dipping, melted
- Mix all ingredients, except for the chocolate, together.
- Roll the peanut butter mixture into balls.
- Place chocolate chunks or melts in a microwave safe container.
- Heat for 30 second increments until the chocolate is completely melted and creamy.
- Dip the peanut butter balls into the melted chocolate and devour!!!
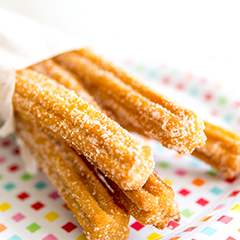
by Gabriela Barba
Okay, so I had to pry this out of my Nana's hands, but here's what you do. This recipe is for churros. We used to make these all the time when I was younger, but we just stopped. She got tired of me, I guess.
-
Ingredients:
- 5 T butter
- 2 T sugar
- 1 cup water
- 1 tsp vanilla
- 1 tsp fine sea salt
- 1 cup all purpose flour
- 3 eggs, plus one egg yolk
- Neutral oil for deep frying
- Cinnamon and sugar for tossing
- Bring the butter, sugar, and water to a boil. Once boiling, bring it off heat.
- Once off, add the vanilla, fine sea salt, and flour.
- Stir until thick and let cool for 10 min.
- After done cooling. Add 3 eggs, one at a time. And then a singular egg yolk.
- Transfer to a piping bag with a star tip.
- In a pot, fill a little over half way with fry oil. When the oil is ready, squeeze your dough for 5-6 inches. Let fry for 5 minutes and flip until evenly brown.
- Toss into a cinnamon-sugar mix and then serve. And boom, churros!
- Nana, I'm sorry for leaking your recipe like this.
- Ps. The secret ingredient is love. If it's not there, we can tell.

by Joanna Chase
Preheat oven to 425F.
Ingredients:
- 1 box Pillsbury pie crusts
- Flour, to dust the work surface
- 1 potato, finely diced
- 1 onion, finely diced
- 1 large carrot, finely diced
- 2 T water
- ¼ lb ground beef
- Mix diced potato, onion, and carrot with the water and the ground beef. Add salt and pepper to taste.
- Flour surface and lightly roll out pastry. Cut into rounds using a saucer.
- Place 2-3 T of the meat mixture in the center of each pastry round.
- Moisten edges lightly with water, then press the edges together on top.
- Cut slits in pastry to vent.
- Place pasties on a cookie sheet and bake for 15 minutes at 425F.
- Lower heat to 350F and bake another 15-20 minutes until golden.
- Remove from oven and serve.
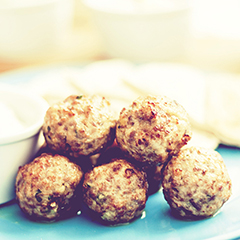
When I was little, my grandmother would make these for parties only, and they were a bit smaller so that you could pop a whole one in your mouth in one bite. When I grew up and started living on my own, I realized I could make these any time, so I made them a little bigger and served them as a dinner entrée. My husband always insists on eating one more than everybody else, and now unfortunately my son does the same. This means we have to count the meatballs very carefully, and there are never any leftovers! Luckily, the recipe doubles very easily.
- 1 lb ground beef (or a mix of beef and lamb)
- 1 egg
- ¼ cup ketchup
- 2 slices sourdough bread, made into breadcrumbs
- 1 tablespoon dried oregano
- 1 tablespoon dried spearmint
- ¼ teaspoon dried garlic or 2 minced cloves of garlic
- ¼ cup or less of dry white wine (A splash! Don't use red wine.)
- Salt and pepper to taste
- About ⅓ cup of white, all-purpose flour, in a small, separate bowl
- Olive oil
- Except for the flour and olive oil, mix everything together well.
- Heat a large pan with a few tablespoons of olive oil to medium low. The low setting will make sure the meatballs finish cooking at about the same time.
- With your hands, take a ping pong sized blob of meat and roll it into a ball about 1.5 inches in diameter.
- Drop the meatball into the flour and roll it around so that it is coated evenly.
- Place the meatball in the pan, not in the center, but around the edge. Continue until the last meatballs are placed in the center of the pan. Turn the heat up slightly, so that you can hear the sizzling, but not so much that they will burn on the bottom.
- Flip them over with a fork when the tops have no pink in them, and are looking rather grey, and the bottoms look well done. If you are using a lean meat, you might need to add a little more oil to the pan after you flip them over. If some of the meatballs are a little bigger, you might need to tip them over and cook them on their sides as well.
- We usually eat these with cooked greens (like kale, collards, or chard), and rice pilaf or noodles with browned butter and mizithra (a hard, salty cheese made from sheep's or goat's milk). In Fresno, mizithra can be found at Whole Foods, Sprouts, and Papaya Fresh.
by Anjali Kapoor-Davis
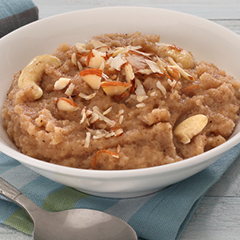
Every year as the weather began to cool and the leaves started to change color my Mother would make Halwa for breakfast. Creamy, sweet, scented with cardamom, dotted with plump golden raisins and slivered almonds, it was and still is one of my favorites. In India it is made with Sooji or semolina but my Mom adjusted her recipe to use Cream of Wheat instead. The aroma of halwa could coax the sleepiest kid out of bed for a cozy morning treat. As I got older I watched her make it and was mesmerized as she stirred the ingredients in the large bowl shaped pot with no handles. It was hypnotic, two solid sticks of unsalted butter melting into a bubbly, comforting, mouth watering liquid. She poured in the Cream of Wheat and each hungry grain sought out the golden liquid and together they continued the dance, guided by a wooden spoon in my Mother's hand. Again the bubbling started and a scent of nutty, toasted deliciousness filled my nostrils. With a single nod of her head I knew to back up to avoid the possible splatter that would always follow when water was poured into the pot. She gripped the pakkad with one hand, a stainless steel tong to hold the pot in place, and stirred even more quickly to help the ingredients combine. With the same single nod she signaled that I could return to her side and see the halwa swell from the hot water it was absorbing. Sugar fell like snow flakes into the pot and disappeared. Cardamon crushed in her mortar and pestle joined in along with plump raisins that had been soaking in warm water near the stove. An offering of halwa to Krishna and blessings for those who would eat followed the preparation of halwa. Then, it was time to enjoy the sweet, creamy, spoonful of heaven. I hope you enjoy it!
- 1 cup (2 sticks) unsalted butter
- 1 cup Cream of Wheat
- 2 cups Warm water
- 1 cup Sugar
- Optional additions: ½ tsp. Cardamon, ½ cup of golden raisins (soak in warm water to plump), ½ cup of slivered almonds, 1 banana sliced thin.
Directions
Melt butter in heavy bottomed pot or wide skillet (not non-stick) on med/hi heat. Add Cream of Wheat and stir constantly for 2-3 minutes or when a nutty aroma is noticed and butter is fully absorbed. Turn down to med. heat and add water slowly while stirring the Cream of Wheat mixture. Be careful, it can splatter. Continue stirring, switch arms if needed, until all the water has been absorbed. If you are adding Cardamon, do that now. Add the sugar and continue stirring. It will resemble a pudding consistency for a short while and then thicken and pull away from the side of the pan/skillet. You will see a little rim of butter around the edge when it is done. Remove from the heat and add your raisins or almond or banana and cover for 1 min. Those are optional, my husband and son prefer it without the add ins. Enjoy!
by Amy Richardson
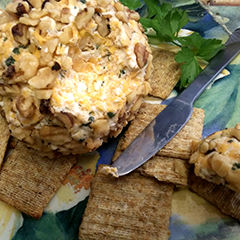
My paternal grandmother came to the United States from Kidderminster, England at the age of 8. Kidderminster is in Worcestershire county so the dash of Lea & Perrins in the recipe would be authentic! Kidderminster was the carpet capital of England for a long time, and the Curtis family came over to work in the carpet industry in Pennsylvania. Harriet had a charming English accent all of her life. She married a man of German descent and I remember her stories about trying to make sauerkraut from scratch and it all exploding in the cellar. They lived back East, so a lot of the food they ate, and I grew up eating, was typical of the area. I still love Scrapple and liverwurst.
One dish Gram would make was a cheese ball for Thanksgiving and it was always a favorite and much anticipated part of the day. My father was in charge of a research farm here in the Valley and would bring home all kinds of fruit, vegetables and nuts for the family. He and Gram would sit at the dining room table and crack walnuts, some of which were used for the cheese ball. Gram had bad arthritis in her knees and couldn't stand up to do a lot of cooking so this was her way of contributing to the meal. Her cheese ball is easy and so much better than store bought!
Her directions:
Crumble 4 oz. of blue cheese, mix well with 4 oz of grated sharp cheddar cheese and 3 oz of Philadelphia cream cheese. Add 1 Tbsp of chopped fresh parsley, ½ teaspoon grated onion, dash of garlic salt, dash of Lea & Perrins. Shape into a ball and wrap in plastic wrap, chill overnight/until firm. Reshape ball and roll in chopped walnuts.
We like this with Triscuits, but use your favorite cracker, also good on celery sticks.
I usually make double, since you don't find the small (3 oz) packages of cream cheese any more.
Substitutions: I sometimes use chives for the grated onion and you can use garlic powder if you don't want to add salt. Also good with chopped pecans instead of, or with, the walnuts.
*Tip: It is better made 1-2 days in advance, but don't roll in the nuts until the day you serve it, otherwise the nuts get soggy.
by Chris and Jerome Her
Total time: 48 hours prep time + 30 min cooking
Similar to many sausage origins out there, this recipe born from the practice of consuming all parts of a slaughtered animal. Traditionally, only men were permitted to eat this dish because of the hard labor they put into clearing the fields. Since it was customary to divide the product among the men until each had his full share, only leftovers - usually none - went to the women and children. Mom first observed her grandfather making this at an early age even though as a child, she rarely consumed it.
Growing up, this dish was usually served at home only during the holidays. Despite the simplicity, it is still a treat, especially since we have it so rarely. I'm glad traditions have changed and everyone is able to enjoy it now.
Ingredients:
- 10 feet pork intestines or natural sausage casing
- 5 cups glutinous white rice
- ½ cup chopped ginger
- 1 tbsp lard
- 1 tbsp salt
- 1 gallon water
- If using natural sausage casing, skip this step. Thoroughly clean intestines inside and out. Cut intestines into 2-3 foot segments. Tie one segment end with butcher's twine. Inflate intestines by inserting a straw into other end and blowing by mouth. When inflated, pull out straw, pinch end and tie with butcher's twine. Intestines should resemble an inflated twisting balloon. Set intestines aside for 48 hours at room temperature to air dry. After drying, snip one end and soak in water to rehydrate.
- Add 1 gallon of water to rice to soak. Add ginger, lard and salt. Let mixture soak for 3 hours.
- Insert a funnel (with a minimum ½" spout) into the casing. Hand fill casing by spooning rice mixture into the funnel. Periodically invert sausage and spout to remove excess water. Tie sausage end with butcher's twine.
- Place rice sausages in a steamer for 30 minutes. Serve hot.
by Tami Mattos
The sopas is very special to the Portuguese people, and is made at home and in large quantities to feed everyone at the Portuguese celebrations that are held throughout California and other states.
- 4 lb chuck roast, and meat bones
- 1 small onion, minced
- 10 cups water
- 1 T pickling spices
- ½ cinnamon stick
- ½ cup wine
- ⅓ cup tomato sauce
- 1 cabbage head, cut in half
- 1 loaf French bread, sliced
- 1 mint sprig
- Salt, to taste
- Bring water to a boil, then add meat, wine, onion, tomato sauce, mint sprig, and salt. Add the pickling spices and cinnamon, tied up in cheesecloth.
- Cover and cook until the meat is tender, about three hours.
- Add the cabbage halves and cook until they are tender.
- Line a deep serving dish or tureen with the bread slices and put the mint sprig in the middle. Pour the boiling broth and cabbage over the bread.
- Remove the meat to another dish and serve with sopas.
by Star Garcia
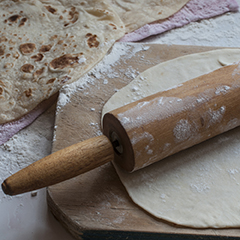
When I think of home, I think of my grandma. Home does not necessarily mean a place for me, it's a person. My grandma made any house feel like a home no matter where she was. I like to say a century of life, love, and food. She survived to the great age of 100, passing this year in August of 2020. A warm and loving woman, she fed many with her hands from homemade tortillas to tamales. The amount of food was endless, but my fondest memory are her tortillas.
This tortilla recipe gives me the most nostalgia. I think back to my childhood, waking up at 6 a.m. to the delightful aroma of the comal being used to make the flour tortillas. The sounds of the rolling pin smacking the countertop echoes in my memory, as I can imagine this little tender lady rolling out balls of dough so perfectly round. Tender yet slightly crispy, these delightful tortillas can be used to pair a dish or served with butter for a tasty snack.
Ingredients
- 3 cups all-purpose flour
- 1 teaspoon salt
- 1 teaspoon baking powder
- ⅓ cup extra virgin olive oil or vegetable oil
- 1 cup warm water
- Combine the flour, salt and baking powder in a bowl. Mix until well combined.
- Make a well in the center of the dry ingredients, then add the oil and water. Stir until all the dry ingredients are well incorporated, and the dough begins to come together and form a shaggy ball.
- Turn the dough out onto a lightly floured work surface and knead for 1-2 minutes, or until the dough is smooth.
- Place the dough on a lightly floured work surface. Divide into 16 equal balls and flatten them with the palm of your hand. Cover flattened balls of dough with a clean kitchen towel and rest for at least 15 minutes.
- Heat a large pan, preferably cast iron, over medium heat. Roll each flattened ball into a circle, keeping the work surface and rolling pin lightly floured. Separate uncooked tortillas to prevent them from sticking together. Do not stack them on top of each other.
- When the pan is hot, place a tortilla into the pan and allow it to cook for about a minute or until the bottom surface has a few brown spots and the top starts to bubble.
- Flip the tortilla.
- Remove from the pan and stack in a tortilla warmer or a covered container to keep the tortillas soft and warm.
- Serve warm or allow to cool for later use.
- Makes 16 tortillas.
by Dalya Hussein
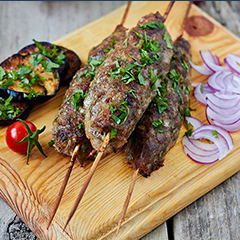
The Iraqi Kabab is one of the unique famous dishes that can be eaten for the three main meals (breakfast, lunch and dinner). Back in Iraq it is very easy to find this delicious dish everywhere in all the cities all over the country, and they all cook it exactly the same way, I still keep the smell of the Iraqi Kabab in my nose and I've never tasted anything similar to it maybe that what made me choose this dish.
I remember that when my mother was so busy that she could not cook for us she used to order kabab. At the same time, when she used to have a lot of relatives or friends invited to our place she would also cook kabab, so this dish is very common, easy and important at the same time. It is one of many things that could give you the sense of my country, Iraq.
- 1 ½ lb. ground beef (or lamb) meat
- ⅓ lb. lamb fat, chopped
- 1 onion, diced
- 1 tomato, diced
- 2 tablespoons chopped parsley
- 2 teaspoons salt
- 1 teaspoon black pepper
- ½ teaspoon sumac
- ½ cumin
- 1 teaspoon paprika
- For the garnish
- 1 tablespoon parsley
- ½ teaspoon sumac
- Place the diced tomato and onion in the center of a large cheesecloth. Close the cheesecloth and squeeze very hard on the tomato and onion to extract the juice. Discard the juice.
- In a large bowl, mix all the ingredients as well as the squeezed tomato and onion.
- Let the mixture rest for 1 hour in the refrigerator, kneading it every 15 minutes.
- Take a piece of meat and squeeze firmly on a long, wide metal skewer and form a long kebab.
- Repeat the process until the meat is all used.
- Grill the skewers for about 3 to 4 minutes per side, preferably on a charcoal fire. It is important to turn the skewer regularly, otherwise the meat may come off the skewer.
- Sprinkle the skewers with 1 tablespoon chopped parsley and ½ teaspoon sumac and serve immediately with bell peppers and tomatoes, grilled on the same fire.
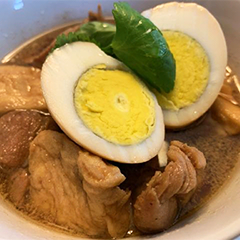
Recipe by Kingkarn and Noppakan Sirikul
My mother and I chose this recipe because it was one of my favorites growing up. I remember
how excited I would be coming to the kitchen and seeing that grandmother made Kai Paloh. Now that she has passed, my mother continues to make this dish, and I still enjoy it just as much as I did when I was younger. One memory I have is in 2015 when my mom visited Thailand while my dad, brother, and I
stayed at home. Before she left, she made a few of our favorite Thai dishes to last us a few days,
including Kai Paloh. We ended eating all of the Kai Paloh in one day!
Preparation time: 20 minutes
Cooking time: 70 minutes
Ingredient list:
- 10 peeled hard-boiled eggs
- 2 lbs of pork sirloin
- 12 oz. pack of fried tofu
- 3 cilantro roots
- 5 cloves of peeled garlic
- 1 Tsp white (or black) whole peppercorns
- 1 Tsp vegetable oil
- 2 Tsp dark soy sauce
- 3 Tsp fish sauce
- 1 Tsp salt
- 1 cup brown sugar
- ½ cup white sugar
- Boiling water
- Cut the fried tofu and pork sirloin into 1-inch thick cubes and set aside
- Grind the cilantro roots, garlic, and pepper together to form a paste
- In a large pot, add the vegetable oil to high heat. Once the oil has reached its boiling point, add in the cilantro, garlic, and pepper mixture and stir until fragrant
- Add in both the brown and white sugar and stir until fully dissolved (should reach a brown color)
- Add in the pork sirloin cubes, soy sauce, fish sauce, and salt. Cook in the mixture until the pork is done (around 5-10 minutes)
- Add in the peeled hard-boiled eggs and fried tofu and stir so that the mixture is fully incorporated into all of the components
- Add boiling water until it covers all of the stew components. Simmer for one hour on medium heat.
- Serve over rice and enjoy!
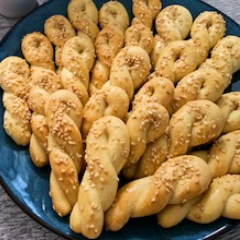
Easter has always been my favorite holiday. I love everything about it: dyeing dozens of hard-boiled eggs and putting up all the springtime decorations of rabbits and chicks, and even the idea of the world springing back to life after a cold and dormant winter. But the part of Easter I love the most is the food! These Easter cookies, koulourakia, are a family favorite, and I don't always wait until the right time of year to make them. They are kind of like the Greek version of biscotti, perfect for dipping into your morning coffee or afternoon tea, and they aren't so sweet that you feel guilty about eating more than a few of them.
Making these when I was very little, at my grandmother's side, is one of my earliest cooking memories. She did not bake very many sweets, but these koulourakia were one of the big exceptions, because they were for Easter. They have aniseed in them, and I remember us every year trying to get the right amount of aniseed flavor into the dough, trying to guess how much the flavor would bloom after the cookies had aged a day or two. Too much aniseed, and it was a licorice cookie that nobody wanted to eat. Too little, and it didn't have the right subtle flavor. I struggle with that balance even today! But I don't mind the struggle, because it takes me back to those happy days with her by my side.
The shapes are also important. The dough is rather stiff, and you roll it into ropes and shape the ropes into snakes or circles. The twisted snakes are my favorite shape, but I usually include a few ourobouros (snakes that are circles). This is the most time-consuming part of making koulourakia, but it's also the most fun, because this is when you get to chat. My grandmother and I would have so much fun chatting, gossiping, and telling stories while we rolled the dough out, shaped it, and pinched off little bits to eat! When all the dough was shaped, we would then brush the tops with beaten egg, and she would let me sprinkle the sesame seeds before we popped them into the oven to bake. As a kid, I loved scattering the sesame seeds on top of the egg wash, racing against time so the wash would still be sticky enough to hold onto them. As an adult, I still race against time, and again, I don't mind the struggle because it reminds me of my grandmother and our time together in the kitchen.
Here is the recipe! I tinker with it all the time, because I think Greeks are incapable of actually following a recipe to a T. In fact, if you change the recipe a little bit, it would be a very authentically Greek thing to do!
- 1 stick softened butter
- 1 cup white sugar
- 2 large eggs, plus another to use for the egg wash
- 2 ½ teaspoons vanilla
- ½ teaspoon anise extract or slightly crushed aniseed (you can add more after tasting the dough, if needed)
- 3 cups white flour
- 1 ½ teaspoons baking powder
- 1 tablespoon water (or more, if the dough is dry)
- Sesame seeds to sprinkle on top
Cream the butter, then add the sugar and mix well.
Beat in the eggs, then add the vanilla extract. Also add the aniseed extract or aniseed. Or both!
Add the first cup of flour, along with the baking powder. Mix well, then work in the rest of the flour. If the dough is too dry, add a bit of water, but the dough should be stiff and workable, like clay.
Shape into snakes or circles, as shown in the pictures on the previous page.
Beat an egg, and brush it onto a few cookies at a time. A pastry brush works the best, but in a pinch, you can use a paper towel or a bit of crumpled up plastic wrap. Sprinkle the sesame seeds liberally onto the cookies before the egg wash dries. Continue until the tray is done. This recipe will make several trays, and about 3 dozen cookies, depending on how large you make them. I make them about as long as the palm of my hand.
Bake at 350 degrees, for about 20 minutes. Because all ovens are a little different, keep an eye on the first batch to see how long they really take. They should get slightly golden. They taste even better the second or third day!

by Alexa Bueno
One of our family recipes is French fries (made in home) with crema and queso cotija (both Mexican cheeses) drizzled and sprinkled on top of it, and salt, obviously. It's not really special or meaningful, but we just creatively made it and it was good to us. We liked adding crema and cotija on a lot of our foods, so we thought why not add them on fries, too?
Ingredients
- 2 or more russet potatoes, sliced into fries
- Olive oil
- Salt, to taste
- Crema Mexicana Sour Cream, to drizzle
- Cotija, crumbled
Toss the fries in oil and spread out on a lined cookie sheet. Sprinkle salt on them. Roast at 375 degrees until golden brown and slightly crispy, for about half an hour.
Sprinkle the cotija on top, and then drizzle the crema generously on top of the fries.
by Kai-Mei Loo (inspired by mom Angie Ang)
Growing up in Malaysia, a multi-racial country, I was fortunate enough to surround myself with food from many different ethnicities. There are unlimited, affordable options of snacks or main courses everywhere, from roadside street hawkers to dine-in restaurants. In addition to that, my mom is an excellent cook. She can turn any ingredients on hand into a sumptuous meal. I was always well fed. I was so spoiled.
In 1989, my older sister, Wei Wei and I bought mom a cookbook "Hong Kong Dim Sum (Au, 1986)" for her birthday. Since then, she has been making her specialties following the recipes in the cookbook. To date, she has mastered many delicacies and can make them perfectly without referring to the cookbook.
My three sisters and I are definitely huge fans of mom's cooking. All my mom's siblings, nieces, nephews and their spouses love my mom's food. Now, her grandchildren, grandnieces and grandnephews are also very fond of her cooking. I remembered during our school years, my sisters' and my friends who came to our house to do homework or study always loved to stay for dinner to enjoy mom's cooking.
After moving to the US by myself, I lost the easy access to the food I grew up enjoying. Moreover, I'm not a good cook and shamefully didn't learn from mom. Eating mom's food is now like a splurge for me. It usually is because either I'm visiting my family in Malaysia or mom is visiting me in Fresno. I told mom about this recipe story writing event and she agreed to share her family's most enjoyed food. I will write and practice at the same time how to cook each recipe.
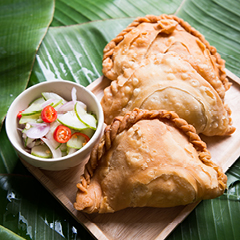
Curry Puff
Curry puff is a never to miss item in almost all gatherings in Malaysia. I think the best way to describe curry puff is that it is the Southeast Asian version of a better tasting empanada. It has a flakier crust and its filling is more flavorful due to the curry spices and seasonings. Since my mom learned how to make this from her cousin's wife, it is an always requested item in every family gathering whether it is birthday, holidays or just a casual get together. My mom said it doesn't matter how many pieces she makes; it is never enough. The plate will always be empty before the end of the gathering and there will always be someone complaining because he/she didn't get any. My sister said she could live off just mom's curry puffs. It is her desert island food and even last supper.
Ingredients:- FOR THE FILLING
-
- 3 tbsp. vegetable oil to stir fry
- 5-6 shallots, thinly sliced
- ½ medium onions, diced
- ½ lbs. (3-4 medium) potatoes, parboil for 3-5 mins then diced
- 2-3 stalks lemon grass, smashed
- ¾ lbs. boneless skinless (½ medium size) chicken breast, chopped
- 6 tbsp. water
- 6 tbsp. curry powder
- 3 tsp. sugar
- Salt to taste
- 1 cup of milk or coconut milk
- FOR THE PASTRY DOUGH
-
- Dough A
-
- 250gm (2 cups) sieved all-purpose flour
- 1 tbsp. castor sugar
- 130ml (½ cup) water
- 50gm shortening/lard
- 1 tbsp. lime juice
- Dough B
-
- 250gm (2 cups) sieved all-purpose flour
- 120gm shortening/lard
- Make filling:
- In a large frying pan over medium heat, heat vegetable oil.
- Add smashed lemon grass, then sliced shallots. Fry until fragrant, about 3-5 minutes.
- Add diced onion, diced potatoes and chopped chicken breast. Continue to stir fry.
- Add water so that the ingredients do not stick to the pan.
- Add milk or coconut milk. Season with enough salt to taste. Add sugar and curry powder.
- Cook until liquid in filling is all dry. Remove lemon grass.
- Keep filling aside to cool or refrigerate while making the pastry dough.
- Make pastry dough:
- Mix all ingredients for Dough A and B separately in large bowls, and cover each with a damp towel for a minimum of 20 mins.
- Divide Dough A and B both into 4 pcs each.
- Take a piece of Dough A, flatten it and wrap a piece of Dough B.
- Using a rolling pin, flatten the dough into a long rectangle. Fold it into a third and fold the other end over.
- Repeat step 2.4 two more times.
- Hand roll the dough into a long rectangle log. Cut into 8 to 10 pcs.
- Repeat step 2.3 to 2.6 until all pieces of the dough are used up.
- Take a piece of the dough and flatten it.
- Place a spoonful of the cooled filling in it.
- Fold sides together. Seal the sides by pinching and folding (similar to when making pie crush edges).
- Fry curry puff in at low to medium heat until golden brown.
by Miguel Pelegrina, as told to Loren Pelegrina
Mangú is a classic breakfast dish in the Dominican Republic. It is made of green plantains that are boiled and then mashed, with a sauce of onions in olive oil and vinegar. This is commonly accompanied by a fried egg, but steak (meat) is also used.
Plantains were brought into the Americas from Western Africa. The word mangú, as well as the dish, most likely came to the island of Hispaniola with slaves.
Both my mother and grandmother were born in the Dominican Republic. It was during my first visit to their country, at Tia Julia's house, where I first ate mangú. it was quite a heavy/hearty dish, accompanied by steaks, roasted birds, and eggs. I do not think that back then it was my preferred breakfast over pancakes or cereal with milk. But through the years I grew to like it more and more. Eventually, I learned to prepare it by watching my grandmother and my mother in the kitchen.
Years later, I made it for my own family, and it became a breakfast dish for "special" weekends, although these days we can eat it any weekend, and even for lunch or dinner.
At some point I used yucca root for the mangú and now that has become our own specialty. The combination of yucca with the sauce is tastier, the yucca is softer, and easier to prepare. So our recipe is for mangú de yuca.
MANGÚ DE YUCA
Ingredients:
- yucca root (about 2 lbs)
- 2-3 cups of water
- 4-5 cloves of garlic
- 1 tsp of salt
- 1 large onion
- 1 cup of olive oil
- ¼ cup of white vinegar
Peel the yucca. Cut off the very tip and the "woody" stem. Then cut the rest of the root into slices 1-2 inches. Now it will be easier to peel the skin. Now cut the slices into quarters. Remove the center "fiber" that will be easily visible most of the time. (It is ok if it is not removed completely.)
In a large pot, boil the water with the salt. Set to medium fire and add the yucca. Cook for 20-30 minutes.
While that is going - prepare the sauce. Peel the onion and slice it into (1/4 inch) rings. In another pot pour about half of the olive oil. Peel the garlic and slice it. Add to the oil and heat on high until the garlic browns. Remove the garlic. Add the onions and cook for about 10 minutes at medium heat. Add the rest of the olive oil and the vinegar and continue to heat at medium for about 10 minutes, then set at low heat and cover.
Remove the yucca from the water (but do not throw the cooking water away yet) and mash the pieces. Add small amounts of the water to soften the yucca to a consistency firmer than mashed potatoes. It is okay if it is somewhat lumpy. Place the mashed yucca in a deep dish and pour the sauce over it.
This will make two to four portions. Serve it with fried eggs on top.
Enjoy your mangú!
by Juana Guerrero
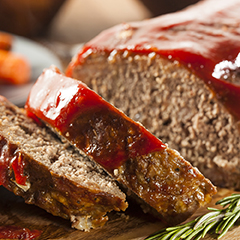
Meatloaf is an old-fashioned recipe, from one of my acquaintances. She personally gave the recipe to me so that I can cook her all-time favorite dish for my family. This recipe has now become one of my family's all-time favorite recipes, therefore we cook this once a month, and have this dish during dinner time or special occasions. We enjoy this meal every time we make it.
It has a flavorful, aromatic, hot, spicy, provoking, juicy taste. For example, you can taste the carrots, celery, and the ground beef, and some of its herbs, and peppers. It is so delicious, once you taste it. The smell when you take it out of the oven makes you just want to eat it. As you can see, this is my favorite dish.
This recipe is very easy to make. It also doesn't take long to bake. Anyone can cook this because it is very simple to make. All you need to do is read the directions and follow it the way it is written. And there you have it.
Also, the nutritional part is not that bad. It is made in a healthy way, and It doesn't have that much fat-- only 4.89 grams of fat. The calories are 155 per serving, for those who are counting their calories. Besides, you can change some of the portions if you want. It has vegetables that make it good for you.
Meatloaf is a dish that has been a classic recipe for many generations. Lots of people cook this meal. Some people use this dish for special occasions. Some just enjoy the way it tastes and cook it all the time.
Ingredients:
- Cooking spray
- ¾ lb lean ground beef (10 percent fat)
- 1 cup chopped onion
- 1 cup chopped carrots
- 1 cup chopped celery
- 2 tsp chopped garlic
- 3 egg whites
- ½ cup breadcrumbs
- ¼ cup ketchup
- ¼ cup beef bouillon
- 1 tsp basil
- ½ tsp oregano
- 1 tsp salt
- ½ tsp pepper
- 1 cup finely chopped potatoes
- ¼ cup chopped parsley
- Preheat oven to 350 degrees.
- Sauté onion, carrots, and celery in a nonstick pan with a little cooking spray until soft. Set aside until cool. Add all other ingredients to the ground beef and mix well.
- Form mixture into a loaf about 4 inches high and place on a lightly oiled baking pan (use a light oil spray). Cover with aluminum foil.
- Bake for 30 minutes. Remove foil and bake 30 minutes more. Let meatloaf rest 10 minutes, then slice and serve with your favorite sauce or gravy.

by Kathleen Kabbani
November 4th and I am standing over a pot of boiling spicy goodness, stirring and stirring. I am making meghli, a Lebanese dessert made with cinnamon, anise and caraway. The fragrance is filling the house with warmth and memories as fragrant as the pudding.
Meghli is usually made to celebrate the birth of a child in Lebanon. All three of my children were born in Lebanon and meghli, bowls and bowls of it, was prepared for guests who would be visiting. If you know anything about Middle Eastern culture, you know it highlights hospitality, social visits, and food! There is something enduring about sharing in the ritual of special food for a significant occasion. My mother-in-law prepared huge pots of this pudding for guests when each of my three children were born. When guests arrived, they were served a bowl of this pudding topped with walnuts, almonds, pistachios, pine nuts and shredded coconut.
When my second son, Ibrahim, was born, the same ritual took place. My first son, Aboudi, was about 5 years old at the time. He would sneak into the kitchen and eat more bowls than he should have. Today he is not a fan of this pudding! However, my second son loved this pudding. He was still a young toddler when his sister Hana was born, so he did not overindulge as his older brother had. In fact, meghli was one of his favorite Lebanese dishes.
Last year, I became the grandmother making pots of meghli for family and friends celebrating the birth of my grandson, Zayn. But on this day, November 4th, I am making meghli, not because a new baby has been born. My son Ibrahim passed away in a car accident several years ago. On his birthday, November 4th, I make meghli in honor of him. The fragrance of the boiling pudding brings back the memories of my children when they were little babies and as they grew. It especially brings the sweet memories of my Ibrahim and for a brief time, he is here in the kitchen with me, laughing and waiting for his bowl of meghli.
Ingredients:
- 1 cup of rice flour
- 1 ¼ cup of sugar
- 1 T of caraway powder
- 1 T of cinnamon
- 1 T ground anise seeds
- 8 cups of water
- Shredded coconut
- ½ cup of walnuts (peeled and soaked in water)
- ½ cup of almonds (peeled and soaked in water)
- ½ cup of pistachios (peeled and soaked in water)
- ¼ cup of pine nuts (peeled and soaked in water)
- In a large pot, combine rice flour, sugar and spices. Mix well.
- Add water while stirring. Mix well.
- When it is mixed well, put the pot on the stove over low heat and stir constantly for about 20 minutes.
- The mixture should thicken to the consistency of porridge or Cream of Wheat. It should not be runny.
- Remove from heat and pour into individual bowls or a large shallow serving dish and let it cool.
- When it is cool, top with about a tablespoon of coconut and then add nuts.
- It will keep in the refrigerator for 3-4 days.
by Amy Richardson
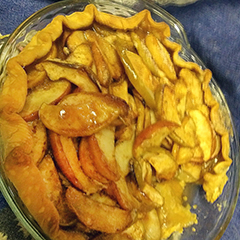
My mom's parents both came from New England; Connecticut for the most part. Mom was born right before the Depression so the frugal New England ways were ingrained in her from an early age. Her mother was a school teacher and, unusual in the early 20's, did not marry until she was about 40 years old. My grandfather worked a few different jobs to keep the family together, one of which was administering electric shock therapy to mental patients. He was a man of foresight; he told my mother when she was young that she should learn Spanish because it would become an important language in the United States. He also cooked with very little salt, thinking it was not healthy. This recipe for apple pie is similar to Dutch Apple Pie in that it does not have a top crust; frugality or saving on fat and calories? This is the pie I grew up eating and we sometimes have for dinner!
Use your favorite pie crust recipe, or I have found the chilled ready-made ones are also ok. Line your pie plate with the crust and crimp the edges.
Put about 5 apples* that have been quartered, cored and sliced, in the prepared pie crust. I sprinkle a little cinnamon sugar on each layer. (Mom used Granny Smith only, but I like to add some red apples as well, I do not peel the apples but that is personal taste)
*The apples cook down so depending on the size of the apples you can use 5 or 6.
Mix the following for the topping:- 2 tablespoons butter-a little soft
- 1 cup sugar
- 2 tablespoon flour
- 1 teaspoon cinnamon for a glaze mixture, or pumpkin pie spice
Stir/crumble and then add 4 tablespoons milk, mix again. Spread this over the apples, trying to coat each slice. This gives the apples a crackly glaze when baked.
Bake at 375 for about 35-40 minutes, checking the apples for doneness at 30 minutes.
by Isariya Locke
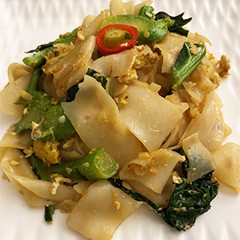
Growing up in Thailand, rice and noodles typically are my daily meal, for breakfast, lunch and dinner. My family in Thailand has a food stall in the hospital located in Bangkok. They serve food all day. When we were young, my brothers and I helped them with everything we could do at the restaurant. The lunch time was the busiest time. We all prepared the food, and were always ready to scoop it up and serve it to the customers. There were a variety of Thai dishes served over jasmine rice. When afternoon came, we would arrange a counter space for fast food a la carte. A mound of crushed ice in a small basin was full of meat slices, chicken, beef, pork, shrimp and cuttlefish for customers to choose to go with their meals. We served fried rice, spicy basil stir-fry with meat, noodles in gravy soup, and stir-fried noodles. My mom taught me to cook all these quick meals so I could fill in when she was away.
Of all these meals, I like the Pad See-Ew the most. It is easy, quick and has only a few ingredients. You can cook it with flat rice noodles or rice vermicelli. I prefer flat rice noodles because I like the texture of the noodle. In Thailand, you can buy fresh flat rice noodles at the market. I remember a time when I went to the fresh market with my mom. The vendor brought out the uncut, warm rice noodle sheets piled up on a wooden tray, then cut them up. I miss the smell and the softness of fresh steamed noodles. When I first came to U.S. nineteen years ago, it was hard to find the fresh flat rice noodles in the Asian market. Only dried rice noodles were available. I am lucky to live in California where I can find a lot of ingredients close to the original. Since I normally go to the market once a week, by the time I cook them, the noodles were not as fresh and soft. So, before I make Pad See-Ew, I separate each strip, then microwave them for around 2 minutes or until the noodles are soft. If I use the dried rice noodles, I like to blanch them in hot water before cooking.
Pad See-Ew literally means stir fried noodles with soy sauce. There are several types of soy sauces in Thailand: thin, dark, thick and sweet, and seasoning soy sauce. Originally, we would use dark soy sauce and seasoning soy sauce, but due to my gluten sensitivity, I cannot eat anything that contains wheat. That is why, in this recipe, I will use the Tamari sauce instead of the dark soy sauce. It satisfies my taste buds and is still close to my mom's Pad See-Ew. If you go to a Thai restaurant, you will probably notice a tray of four condiments: sugar, vinegar with pickled chili, chili garlic sauce and toasted Thai Chili powder. Those are for the noodles. I love to add vinegar with pickled chili and Thai Chili powder to spice up my Pad See-Ew.
This recipe I share is meatless, so I use only eggs as a protein source. If you like to add meat, you can cook meat of your choice after you fry the minced garlic.
Ingredients for 2 servings:
- ½ lb. of fresh flat rice noodles (if using dried noodles, estimate for 2 servings)
- 2 eggs
- 1 tbsp of minced garlic (about 2 cloves)
- 3 stalks of Chinese broccoli (Gai Lan) or substitute with broccoli
- 1-2 tbsp of cooking oil
- 1 tbsp of gluten free oyster sauce
- 3 tbsp or more of Tamari sauce
- ½ tbsp of coconut sugar (or any type of granulated sugar)
- Chinese broccoli preparation: use a knife to remove leaves from the stem, roll the leaves up and cut them into bite sized pieces (about an inch). Cut the stems in one-inch pieces. For the stalks, slice a dry bottom part out before slicing the stalks into diagonal cut (bias cut). Keep the stems, stalks and leaves separated.
- In a small bowl, mix 2 ½ tbsp of Tamari sauce with 1 tsp of coconut sugar, set it aside.
- Heat the oil in the skillet at low heat, then stir fry the minced garlic to release its flagrance.
- Add the Chinese broccoli stalks and stems. Stir fry on medium high heat, cook around 45 seconds.
- Then add the leaves, oyster sauce and ½ tbsp of Tamari sauce and continue to stir fry for about 30-45 seconds.
- Push the cooked vegetables aside in the pan, then crack the eggs, lightly beat the egg yolks, cook until the eggs half-way done, then incorporate with the Chinese broccoli.
- Add the flat rice noodles, pour the mixed sauce on top, then toss and stir until nicely coated. Let the noodles sit for 1-2 minutes to let it caramelize then toss and repeat, if desired. Do not cook the noodles too long, or they will get too wet and break apart.
- Serve with the condiments: sugar, vinegar with pickled chili peppers, soy sauce, and toasted Thai chili powder if desired. Add them or leave them up to your taste.
by Kai-Mei Loo
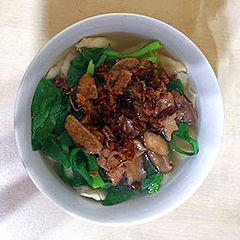
An Asian staple food is rice. We eat it every day for lunch and dinner, even breakfast sometimes. My sisters and I do not favor rice that much. We find rice boring and does not have much variation. Fortunately, we have mom who can make many other homemade delicious substitutes for us. This is a noodle soup dish called pan mee ("flat" noodles).
Mom used to take my sisters and I to have pan mee lunch at a famous street hawker, established in the early 1970's in the city center of Kuala Lumpur in Malaysia. A steaming hot bowl of pan mee under the hot and humid weather was definitely not enticing, but once we had the first bite, everything seemed tolerable and better. You could order different type of noodles: thin, wide and hand torn. Mom's favorite and therefore our favorite is the hand torn. Mom has the gift that once she tastes a dish, she can recreate it almost identically, if not, better. After probably hundreds of trips to the pan mee street hawker, mom started making pan mee at home so that we could enjoy it at our comfortable dining room under the fan. (By the way, the famous street hawker is still in business today 50+ years later and is still operated by the original owner. It has a very a unique name called "Guest from the End of the World".)
Ingredients:- FOR THE SOUP
(If you are not a fan of anchovy, you can use homemade or store-bought chicken broth as substitute. The taste will be less authentic and different than the original recipe.)- 1 cup dried anchovies
- 5-6 cups water
- Salt to taste
- FOR THE TOPPING
- 3-4 shallots, thinly sliced
- 4 tbs. vegetable oil
- 1 lb. boneless pork chops, sliced into thin strips
- 5 dried shiitake mushrooms, rinse and soak in water for 1 hour, sliced
- 1 tbs. dark soy sauce
- 1 tbs. soy sauce
- 1 tbs. oyster sauce
- 1 tsp. sugar
- 1 tsp. sesame oil
- White pepper to taste
- ½ cup water
- Handful of your preferred vegetables as spinach or bak choy
- FOR THE NOODLE
- 500gm (4 cups) all-purpose flour
- 1 egg
- 1 tsp. salt
- 2 tbs. oil
- +/- 450ml (2 cups) water
- Make the soup: Wash the anchovies thoroughly with water. Bring a pot of water to a boil, then add the anchovies. Cover the pot with lid. Turn the heat to low and let it simmer for at least 1 hour. Add more water if necessary, to ensure there are 5-6 cups of stock. Season with salt to taste. This step can be omitted if using chicken stock. Bring chicken stock to a boil and set aside.
- Make the noodles: Mix all ingredients in a bowl and knead into a dough. Cover with a damp towel for at least 30 minutes.
- Make the toppings:
- In a large frying pan over medium heat, heat 4 tbs. vegetable oil.
- Add sliced shallots. Fry until golden brown, about 3-5 minutes. Stirring frequently to avoid shallots from burning.
- Dish out the fried shallots into a small bowl.
- Remove the oil leaving about 1 tbs. left in the frying pan. Add pork and mushroom. Stir fry till meat is cooked.
- Add the dark soy sauce, soy sauce, oyster sauce, sugar, sesame oil white pepper and water. Continue to cook until the liquid is dried up.
- Turn off heat.
- Mix in the fried shallots.
- Bring a pot of water to boil while you prepare the noodle.
- Prepare a small bowl of water. Remove the damp towel from the bowl of dough. Tear a small piece of the dough. Dip it in the bowl of water for a quick second. Using your fingers start pinching the dough to flatten it into a thin wide flat shape. The shapes will be irregular but they are perfectly fine.
- Cook the noodles in the boiling water until they float to the surface. Dish out using a colander.
- Blanch the vegetables in the soup.
- To serve, place the noodle in a bowl, add some soup and the vegetables, then top with as much toppings you desire.
by Courtney Wyatt
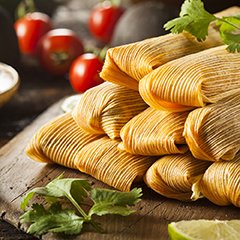
My Great Grandmother's Recipe
We make tamales every Christmas to carry on my great-grandmother's family tradition. My aunt and I have made these tamales since I was 12 years old. I always look forward to Christmas just for these tamales. I love how we can make memories and carry on my great-grandmother's tradition.
One reason why I picked this recipe is because it's been a family tradition passed down from my great grandmother. Every year that recipe is duplicated by our family in memory of her. It's how we keep our tradition alive. My aunt has always been so inspiring to show me the steps to carry on this tradition. I am passionate to try and keep this tradition alive.
Another reason why I picked this recipe is because they are the most flavorful tamales, and I enjoy making them. My aunt taught me how to make the masa, so that is my biggest role in making them every year. She has always told me that too many hands can ruin the masa while mixing it. I like how delicious and satisfying our family tamales are.
Lastly, it brings our family closer together. All of my cousins come from out of town just so we can make these. Family is important to me, so I really enjoy that this recipe can bring us so close in memory of my great-grandmother. I am sure she is looking down on us, proud as ever. I'm glad to be a big part of our family tradition.
In conclusion, Christmas is a special time for me. The tree, the ornaments, the lights and of course the presents. And then that magical day when great-grandma comes alive through our tamale making tradition. For some reason going to bed that night, I feel like I am part of a great family. Thanks, great grandma. I love you.
Ingredients for masa:
- 4 cups of masa harina
- 3 cups of broth
- 2 teaspoons baking powder
- 1 teaspoon salt
- 1 tablespoon chile powder
- 3 ½ pounds of pork
- 6 cups of water
- 1 medium onion
- 2 tablespoons of minced garlic
- 3 ½ teaspoons of salt
- 5 red chiles
- Cook the pork, onion, garlic, chiles and salt in the water for 3 hours.
- When the meat is done, pull it into shreds with two forks.
- While the meat is cooking, soak the husks in warm water.
- Also while the meat is cooking, make the masa dough.
- Place the masa harina in a large bowl, add broth, chile powder, salt, and baking powder. Mix with your hands until the dough is smooth.
- Drain the husks, then spread about two tablespoons of the masa onto the husk, and about one tablespoon of the meat. Roll the husk closed, and fold the tip of the bottom.
- Place each tamale, with the open side up, into a tamale pot or steamer and steam for about 40 minutes.

by Tami Mattos
My grandmother (Va) always made filhos on her birthday for all the family to come and enjoy. I used to make it with her on her birthday and for my daughter's birthday.
Ingredients:
- 6 eggs
- ¼ cup butter, melted
- ⅓ cup sugar
- ½ cup lukewarm water
- 1 package active dry yeast
- 1 teaspoon grated lemon rind
- ⅛ teaspoon salt
- 3 to 4 cups all-purpose flour
- A neutral oil, for deep frying
- Dissolve the yeast in water.
- Beat eggs, then add sugar, butter, yeast, water, lemon rind, and salt.
- Mix well, beating until light.
- Add flour and knead for about 15 minutes, until the dough is smooth. Don't leave the dough too soft. Cover with a warm cloth and let the dough rise until it has doubled in size.
- Heat enough oil to deep fry in a large, deep pan, keeping the heat medium to low.
- Pinch off about ⅓ cup of dough at a time to form the donuts. There will be enough for about a dozen donuts. Stick your finger through the center of the dough to stretch the hole.
- Drop the dough into the oil and fry until golden, turning just once. Remove from the oil and cool on a paper towel. Sprinkle sugar on the donuts and serve while warm.
by Lucille Ramirez
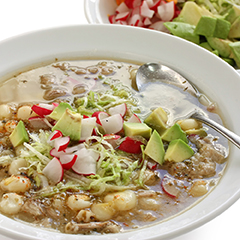
I will be discussing the food that has been in my family and passed on from generation to generation. I will discuss what it is, its origin, and what it means to me.
The dish that has been in my family and passed on from generation to generation is a Mexican dish called Posole. It is a soup that contains shredded of chunks of pork, various spices, and hominy.
Posole is a dish in the Mexican heritage that has been made by many Mexican families and is made in many different ways, depending on the region of Mexico they are from. Posole is usually made for special occasions or as a comfort food.
I learned to make this from my mother and watched my grandmother make it several times, too. Through the years, I have made this dish for my family for special occasions such as holidays, weddings, birthdays, and most important of all, when my husband would return home from his deployments. This dish is very special to me because it has brought my family together and helps us celebrate special moments and to make very special memories.
This dish is my comfort food and will always have special meaning to me. Hopefully when my girls get old enough, I can pass on this tradition to my girls. I hope that this will bring their families together like it has for their ancestors.
Ingredients
- 3 lb pork shoulder
- Kosher salt
- Ground black pepper
- Yellow onion, quartered
- 3 garlic cloves, sliced
- 1 tsp whole cloves
- 1 tsp cumin
- 1 bay leaf
- 4 cups chicken broth
- 2 dried Ancho chilies
- 2 dried Arbol chilies
- 2 dried Guajillo chilies
- 3 cans of hominy, 15 oz each
- Sliced radishes
- Diced cabbage
- Chopped cilantro
- Sliced lemon
- Season pork with salt and pepper in a large pot over medium heat.
- Then add onion, garlic, cumin, bay leaf, and broth. Fill the pot with water to cover the pork by two inches, bring to boil then cover and reduce heat to a simmer for one and a half hours.
- Skim the foam off the top as necessary.
- Place dried chilies into a medium bowl and pour two cups boiling water over them. Let soak 30 minutes and then place chilies and juices into a blender and blend until smooth, adding water as necessary.
- Add chile puree and hominy into the pot with the pork shoulder. Continue to let the pot simmer for an hour and thirty minutes until pork is tender and ready for consumption.

by Barbara Hampton
I called my grandparents Nana and Papa. Papa came from a poor rural region in southern Italy at the age of sixteen, traveling in steerage with his younger brother and sister and arriving at Ellis Island in 1911. They lived in Coney Island with their father, worked and grew up. When I look at pictures of the New York City of that era, I can't believe how they survived it.
After serving in World War I, Papa met & married Nana, who was second generation Italian and had been raised in an orphanage and with various relatives as well as her widowed father. Papa worked, even through the Great Depression, while Nana raised the kids and eventually they were able to buy a small home. My grandfather planted a vegetable garden in the back of the house. Somehow in all his working years, he had become a good gardener and cook, and even taught my grandmother how to cook!
When he retired in the 1960's, they moved to California, living near me and my parents. We visited often at their small, modest apartment. They didn't usually fix any big fancy meals; for the most part we snacked on cantaloupe or a little roasted zucchini or Aunt Bellas cookies (Aunt Bella was Papa's younger sister who also came to the US in 1911. She was a fantastic cook, made the best Italian cookies and lived near my grandparents for a time).
Conversation revolved around old stories about New York, the old friends and relatives, where they had lived and worked, happenings with the family still in New York and news of the day. Even though at times my grandparents had had a rough life, some of the old stories were hysterically funny.
These days, when I talk to my cousin who still lives in New York, we share the memories of Nana and Papa's stories and experiences. The memories and stories we share bring us closer as a family in spite of the distance between us.
ROASTED ZUCCHINI- 2 lbs. zucchini
- 1 Tbl. olive or canola oil
- 1 Tbl. chopped garlic (more or less depending on your taste; add a little basil, Italian seasoning, whatever you like)
Preheat oven to 400 degrees
Cut off stem and blossom ends of zucchini. Slice in thin strips. Toss in large bowl with oil and garlic. Place zucchini strips on sheet pan, spacing so they don't touch. Roast in oven for about 20 minutes, turning half way through for even browning. Keep an eye on them and adjust time and temperature as needed.
AUNT BELLA'S ITALIAN COOKIES
- ½ lb. butter
- 1 cup sugar
- 6 eggs
- 6 cups flour
- 5 tsp. baking powder
- 2 tsp. vanilla extract
- Pine nuts (Pinole) (optional)
Preheat oven to 350 deg.
Cream butter and sugar. Mix in eggs (save a little to brush on cookies later) and vanilla. Add flour one cup at a time, beating well after each addition. Add nuts and baking powder. Knead on floured board until smooth. Roll into shapes by hand (ie. braids, circles, diamonds, etc). Place on baking sheet. Brush with beaten egg. Bake about 12-15 minutes.
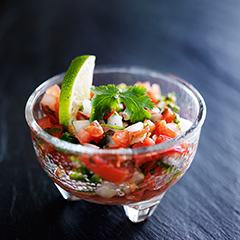
by Alexa Bueno
Salsa
Blend together:
- 1 can whole, peeled tomatoes
- 2 fresh tomatoes
- 1-3 jalapenos
- Cilantro, to taste
- Onion, to taste
- 1 lemon, juiced
- 1 lime, juiced
- Vinegar, to taste
- Garlic powder, to taste
- Onion powder, to taste
- Ground cumin, to taste
- Salt, to taste
Pico de Gallo
Blend together equal amounts of:
- Tomatoes
- Onions
- Guacamole
- Cilantro
- Lemon, to taste
- Salt, to taste
by Kiranpreet Kaur
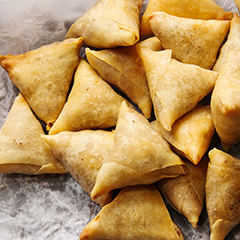
This is my favorite family recipe because I really like the texture of the hard shell on the outside and the soft potatoes on the inside. Also, I really like the spiciness of this dish and you could add more things to make it better as well! This dish was the first Indian dish we made after moving to America and it reminds me of my home country every time I eat it.
Ingredients:
- 20 tortillas
- 6 potatoes, microwaved until soft
- 1 red onion, diced
- ½ cup peas
- Pinch cumin seeds
- 1 cup all-purpose flour
- Salt and pepper, to taste
- 4 green chilies
- ½ T ginger, sliced or grated
- Mash the potatoes and add salt to taste.
- Heat some oil in a pan, then add the cumin and diced onion and pan fry it for a little bit.
- Add a the ginger and green chili to a food processor and mix them with the potatoes.
- Then add the potato mixture to the pan with the onions. Mix the peas into the potato mixture, and let them cook together for about three minutes.
- Add the all-purpose flour into a bowl and use water to make it into a paste.
- When the potato mixture and the flour paste are both ready, warm up the tortillas and then cut them in half.
- Fold a tortilla half into a triangle and then fill it with the potato mixture.
- Close the tortilla from the bottom and from the side flap and seal with the all-purpose flour paste.
- Shallow or deep fry them in hot oil until they are golden brown.
- If you make a lot, you can freeze them and next time you want to eat it you could thaw them, then fry them in oil and they'll be ready to eat!
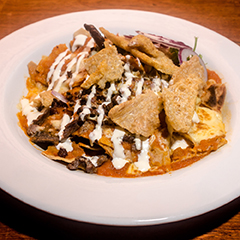
by Maricela Archuleta
Yield: 4 servings
Prep time: 10mins
Total time: 40 mins
Ingredients:
- 10-15 corn tortillas, cut into bite sized triangles
- 9 oz pork chorizo
- 8 oz pork sausage
- 16 oz bacon, thick cut
- ½ cup onion, diced
- 8-10 eggs
- 2 Tbsp milk
- Optional garnishments: queso fresco, shredded cheese, sour cream, avocado, salsa.
- Using cooking shears, cut bacon into small pieces.
- Using a large, 10-inch pan, cook the chorizo on medium heat, breaking it into small pieces. Pull from pan to reserve later.
- In the same pan, cook sausage until browned, breaking it into small pieces. Pull from pan and drain on a paper towel.
- Cook bacon in the same pan. When done, put on paper towel.
- Place your tortilla triangles in the bacon fat and fry until crispy. Put on paper towel drain to excessive grease.
- Put chorizo, sausage, bacon, tortillas and onions into pan and mix well. Scramble eggs and milk in a bowl then add mixture to the pan. Flip from the bottom so that the tortillas do not break up. Cook 10 minutes or until eggs are cooked thoroughly. Add garnishments.
- Special Diet Information
- Switch out Pork products for Soy or Turkey.
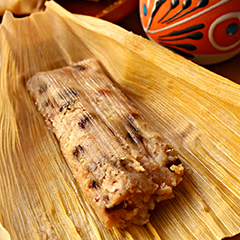
by Simon Perez
My Family's Sweet Raisin Tamales
My family's sweet raisin tamales have been part of our tradition for many years. The recipe has been passed down from one generation to the next. We all gather a week before Christmas, talk about the past, present, and future. Everyone gathers around the table with their choice of drink, ready, some not, to start making tamales. Raisin tamales are not the only ones we make. Pork tamales are also made, hence the "some not" ready. It's the raisin tamales that I remember and cherish the most of all.
I don't know how far back this recipe goes. The wonderful amount of cinnamon my grandmother would add was perfect to my taste. You would find a raisin in every bite, even a small nibble. The red box with the lady on the front was always in the house that day. C & H Sugar was their choice of sweetener. Guaranteed, on this day you will find Sun-Maid Raisins and C & H Sugar in the house. The masa, as long as it was a Mexican brand and met grandma's approval, was fine. Then came the stories.
The stories were always interesting and funny, but there were some stories that some family members would get upset about. Like, "Remember Shorty, how Margaret had to push you out of bed, just to get you to work?" Grandma would fix that quickly, just by saying "¡Cállate!", meaning shut up. Not in a mean way, just her way of saying enough. Oh! And you can't forget, everyone had their own remedy for curing something. The one I found stupid in my adulthood, was peeing on your feet, "Really!" Never worked (Ha!), but passing things on is so wonderful, people should never stop that.
That's where family traditions come in. Passing things down to your children and your children's children. To never forget what was taught from your mom to daughter, like how to knit a blanket out of a ball of yarn, or to prepare and season food so that it tastes amazing. Same with the men-- they too pass things down to their sons, like digging a deep hole in the ground, throwing wood in it and starting a fire. Well, real BBQ. To love someone is to never forget your traditions together.
Family recipes are to be cherished and saved in a family cookbook that you can share with your children, so you can cook like your mom did, with the right amount of cinnamon, while telling and remembering family stories with the next generation. Tradition is something we should all have in a household so that you never forget where you came from and what you have learned. With family at your fingertips, the love never goes away. That's what sweet raisin tamales mean to me, all that rolled up into a gift.
Ingredients:
- 2 bags of corn husks
- 5 lb masa (dough)
- 1 cup warm water, as needed
- 1 cup warm manteca (lard)
- 1 Tbsp ground cinnamon
- 1 stick butter, melted
- 2 cups sugar
- 1 box Sun Maid Raisins, 22 oz
- First, we clear one side of the sink and plug the drain.
- Add the two bags of corn husks into the sink, submerging them under boiling water. Cover them with a towel and let soak until the masa (dough) is ready to spread.
- Put the masa into a large bowl with the cinnamon, sugar, and raisins, and mix until well blended.
- Add to the masa mixture the warm water, melted butter, and lard, and mix until the masa is smooth.
- Cover a dining table or other large workspace with plastic, to minimize the cleaning.
- Drain corn husks from the sink, place in a large bowl and set in the center of the table or workspace.
- With a spoon, place ⅓ cup of masa (or a little more if needed) onto the husk, roll, and fold the tip.
- In a tamale steamer pot, add water just below the large steamer insert. Place the heat safe bowl in the center of the steamer. This will help your tamales stand up. Start adding your tamales around the bowl, open side up.
- Cover and cook for 1 to 1 ½ hours on medium heat, adding water as needed. All ingredients are adjustable to taste, next year.
by Dalia Arenas Mondregon
This is all about my story of the tamales and how it started as my family tradition. I learned from my grandmother and my mom how to do the tamales two different ways, with chicken and pork. One day, I decided to teach my kids to do some tamales, too. My kids enjoy doing them because as we do them, they like to play with the masa and yes, they make big mess but that is my favorite reason for doing the tamales with them! They always have fun, and they even learn how to measure, how to read, and even how to use the numbers that will help them to be successful in the future. Sometimes my kids like to add food coloring or some fruit to their tamales, and we also usually make some champurrado, which is a kind of hot chocolate with cinnamon and milk.
Filling Ingredients:
- 2 lb boneless pork shoulder, trimmed
- 1 white onion, large
- 4 cloves garlic, minced
- 2 bay leaves
- Salt to taste
- Water to cover
- ½ tsp cumin
- 2 cloves
- 1 lb Roma tomatoes
- 4 dried chiles de arbol
- 2 Tbsp caldo de pollo (or chicken bouillon)
- 8 chiles de guajillo
- 1 ¼ cups lard
- 4 ½ cups fresh corn masa dough
- 1 Tbsp salt
- Cut pork into three chunks and place in a large saucepan. Add onion, garlic, bay leaves, cloves, cumin, and salt and cover with water. Bring to a boil. Skim foam from the surface. Reduce heat, cover, and simmer for one hour. Remove the pork and let cool. Strain broth and reserve.
- Bring another pot of water to boil while the pork is cooking. Add tomatoes, chiles de árbol, and chiles guajillo, and boil until chiles are soft, about five minutes. Remove with a slotted spoon, reserving cooking water, and allow to cool.
- Place banana leaves in a pan and heat them for one minute on each side, until you can work with it.
- Combine tomatoes, ½ cup cooking water, chiles de árbol, chiles guajillo, and caldo de pollo in a blender. Blend until smooth. Strain the sauce through a fine-mesh sieve.
- Beat lard with an electric mixer in a large bowl until fluffy. Combine masa, two cups of the reserved pork broth, and two tablespoons salt. Mix until it has a smooth cookie dough consistency. Test if the masa has enough salt.
- Shred pork with your fingers if cool enough.
- Select a banana leaf and heat it up in a pan until it gets dark on both sides and soft enough for you to work with it. Spread about two or three tablespoons of the masa mixture onto the banana leaf, filling it up to three inches from the bottom and 1/3 inch from the top. Add two tablespoons of the sauce and pork down the center of the masa mixture. Fold the bottom of the banana leaf up, fold the two sides over, then wrap a string around it so the two sides do not open up. Repeat with the remaining banana leaves.
- Place a steamer insert into a large pot and fill with water to just below the bottom of the steamer. Bring water to a boil. Add banana leaves to the bottom of the steamer for your tamales get more flavor, then add the tamales with the open side up.
- Place a little of the tamale masa on top of the lid, then close the lid and cook until the masa on the top is cooked. That is how you know that your tamales are ready to eat, or after about one hour. Let tamales rest for 15 minutes before serving and enjoy your tamales!
by Nida Van Camp
Eating My Empire, Flavorful Dish
I would like to share this dish because it is easy to prepare and make. It is also well known not just in my country, Thailand, but also all over the world.
It is important to me because it has all kinds of flavors. Most importantly, it makes me feel like I am home.
Papaya Salad (Som Tum) is a light, fresh colorful salad that embodies the flavors of Northeastern Thailand. All of the ingredients are pounded together in a wooden mortar and pestle which helps to develop the sour, savory and spicy flavors. Once you taste this flavorful dish, it is easy to see why it is so well loved! I make it as an everyday dish and of course we can't miss having it at every party or special events as well.
How is Papaya Salad related to me?
First of all, I am a Thai girl who has lived back and forth between the US and Thailand since 2005 and I did not have any family here but me. Now I have a family of my own, however they are all American and none of them can cook my food. As Som Tum is my most favorite, I was dying to eat it everyday. But could I make Som Tum? I did not know how to make it. I had been struggling, not knowing how to make Som Tum, and spent a lot of money buying Som Tum from restaurants. I did this until I was pregnant with my first born, when my strong craving of Som Tum was torturing me! That was the turning point, when I learned how to make Som Tum on my own. I Googled recipes and mixed many recipes together until I found the taste I love. I have stuck to this recipe, and it has become my signature Som Tum. The secret is that I always add shrimp paste when others might not. I think it tastes better with shrimp paste and we use it a lot in many dishes, including Som Tum. The taste of Som Tum I have made is similar to the Som Tum taste that I loved eating with my family back in Thailand.
- 2 cloves of garlic, peeled
- 7 dried Thai chili peppers
- 1 tbsp crumbled palm sugar
- 1 cup of long beans (chopped about 5 cm. long)
- 5 cherry tomatoes (cut half)
- 4 cups of shredded green papaya
- 2 tbsp lime juice (about 1 lime)
- 1 tbsp of fermented fish sauce
- 1 tbsp of fish sauce
- 1 tsp of shrimp paste
- Combine garlic and dried Thai chili peppers in a wooden mortar and pestle. Pound until chili peppers are broken apart and garlic is finely ground.
- Add palm sugar and shrimp paste. Pound until sugar starts to dissolve.
- Add long beans, tomatoes and shredded green papaya. Use a spoon to mix them together.
- Add fish sauce, fermented fish sauce and lime juice. Gently pound them all together with the pestle so that everything gets mixed together.
- Serve immediately!
(You can adjust the amount of chili peppers, all fish sauces and lime juice to your taste. Be cautious with the amount of the dried Thai chili peppers suggested in the recipe because it is extremely hot. You can reduce or leave them out completely if you prefer.)

by Tami Mattos
Ingredients:
- 4 cups water
- 2 T onion, minced
- 2 T olive oil
- 1 clove garlic, crushed
- 2 cups turnip greens, cut small
- 2 potatoes, cut small
- 1 lb ground beef or linguica
- Salt, to taste
- Sauté the meat.
- Bring the water, onion, garlic, and salt to a boil.
- Add the sautéed meat, turnip greens, and potatoes. Cover and cook until the greens and potatoes are tender.
- Serve hot with Portuguese corn bread or bolo do Pico.
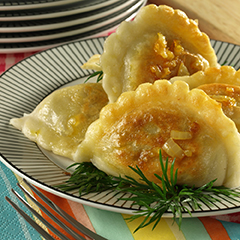
by Karen Hankins
Here is my grandma's recipe for Ukrainian Pierogi. It is known in the Ukraine as Pudahe. I left in the spelling errors and humorous stuff from the family member that typed it up about 30 years ago.
Marie's recipe for puda-heh
(I don't know how to spell it because she labeled it Pyroky)
Dough:
- 4 cups flour
- 1 egg
- 1 ¾ cup warm water
- ½ tsp salt
- Melted butter (optional)
- Brown onion, chopped (optional)
- Sour cream (on the side)
Combine water, egg, salt and add 3 cups of flour. Mix well and knead in the 4th cup of flour until smooth and elastic. (Important!) Brush with oil and set aside for 15 minutes. Roll out (not too thin), cut into 2 and half-inch strips, then into 2 and half-inch squares.
Place filling in center - pinch sides into triangle shape. Drop into boiling salted water and stir with wooden spoon to prevent sticking. Boil 4-5 minutes. Strain in a colander and pour cold water over them. Drain, place in a dish, sprinkle with oil (melted butter is better, or chopped brown onion) and serve hot.
(We ALWAYS serve these with sour cream.)
Prune Filling
- Cook prunes as for stewed (water, sugar - very small amount) and boil first then simmer for 15 minutes, covered. Cool. Chop up prunes (I use scissors for this). Place into dough- be sure the prunes are not too watery - do not use juice.
- Scald 2 cups sauerkraut - drain and press out water. Chop fine (on a breadboard is a good way). Fry one-half cup chopped onion in 4 tablespoons oil. Add to sauerkraut.
- Buy hoop cheese or Farmer's cheese (a dry cottage cheese). Crumble in a bowl, add salt and pepper - (egg, beaten, can also be added).
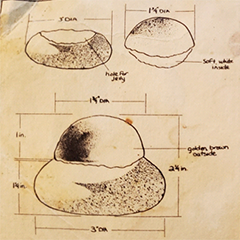
by Annika Janzen
Here's my grandma's recipe for zwieback, from our Dutch/Russian Mennonite tradition.
My Grandma Janzen used to make dozens of these at a time, then put them in the freezer so she always had some on hand for meals. She taught me how to pinch the dough to form the rolls, and to make a double batch of dough so we could also make cinnamon rolls while the zwieback baked. Now the zwieback-making has been taken up by my me, my brother, my sister-in-law, and whoever is around to help pinch dough! We only have them on special occasions and family gatherings, but they'll always remind me of baking with my grandma.
- 3 cups milk
- 3 teaspoons sugar
- 3 teaspoons salt
- 3 packages dry yeast
- 1 cup butter
- 10 cups flour
Dissolve yeast in water. Add sugar, warm milk, butter, and salt. Add flour until dough is soft. Knead thoroughly (an electric mixer and dough hook are great for this if you have one). Cover, and let rise until doubled in size. Punch down, let rise again.
Shape rolls by first pinching off a 2" ball, then pinch off a 1" ball and press on top. Allow to rise on pan. Bake at 400 for 15 minutes. Makes about 3 dozen zwieback.
Here's an old recipe card.
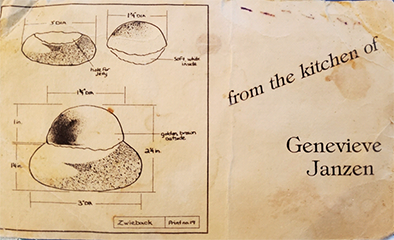
For more program details call 559.600.9699 or email: Isariya.Locke@fresnolibrary.org

This project was made possible with support from California Humanities, a non-profit partner of the National Endowment for the Humanities | calhum.org

